This is part four of five in my Use Docker to create a local WordPress development environment tutorial.
About Dockerfiles
Dockerfiles are text files that provide instructions to Docker on how to start with an existing image and build a new, customized image through a series of instructions. I was aware of Dockerfiles from my introduction to Docker on LinkedIn Learning. I did not think I would need them for a basic WordPress environment. But I wanted to learn more about them, and thought that I could use Dockerfiles to create customized WordPress and phpMyAdmin images to use with Docker Compose. That way I could avoid manually customizing the container the way I did in WordPress and Docker: Customize a Docker container.
I looked around and found this Dockerfile tutorial by Mark Takacs, which had a long video that I found very informative and enlightening. I looked around to see if anybody else were using Dockerfiles for something similar and found this tutorial on DaveScripts.com that included a php.ini file being copied with a Dockerfile.
Create a Dockerfile for customizing a WordPress image
- Earlier we created a directory just for our Docker projects. Navigate into that directory.
$ cd ~/Documents/docker - Create a new directory to store your Dockerfiles:
$ mkdir dockerfiles - Create a directory for the Dockerfile that will create a custom WordPress image.
$ mkdir ~/Documents/docker/dockerfiles/wordpress - Navigate into that directory and create a file called
dockerfile. As with Docker Compose, projects, which always uses the file namedocker-compose.yml, Dockerfiles are always nameddockerfile.$ cd docker/dockerfiles/wordpress && touch dockerfile - Open this link to my Dockerfile for WordPress on GitHub, select all of the text, and copy it.
- Open the
dockerfileyou created with your text editor and paste the text from my Dockerfile into it. - Make any changes to file names or file paths that are needed and save your
dockerfile.
What’s in this Dockerfile?
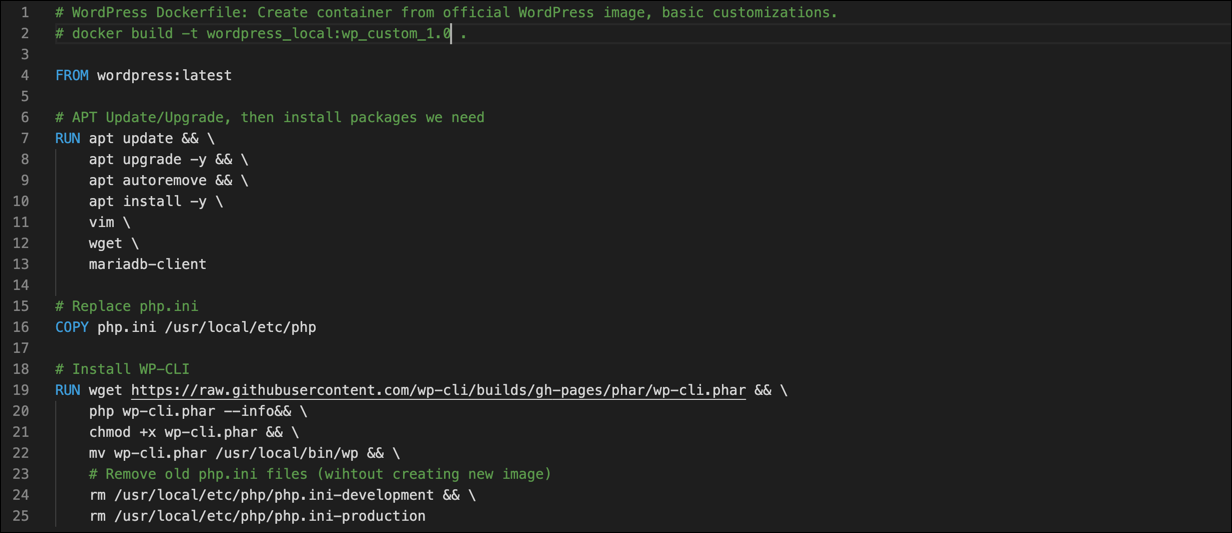
Some of the syntax here looks like standard Linux commands or what you might see in a Bash script. What makes Dockerfiles different are instructions, of which there are several. However, I am only using a few simple ones here. Every Dockerfile must start with the FROM instruction: what is the base image? In my case, I am using the official WordPress image from Docker Hub (wordpress:latest), but you can use an image from a different registry, such as a registry you manage yourself.
After we get the base image I use the RUN instruction to run a series of commands, just as if it were a Bash script. In this example, I RUN commands to do an apt update and upgrade, install Vim, install wget, and install the MariaDB Client that is needed for the WP-CLI tool. These are some of the same commands I used in the previous article, but now I get Docker to make those customizations when it builds my image.
Then I use another RUN instruction again to install WP-CLI just as I did manually in the previous article. I also use this instruction to clean up the /usr/local/etc/php directory by removing php.ini-development and php.ini-production.
Next there is a COPY instruction. Not unlike the cp command, this COPY looks for a php.ini file in the directory where the Dockerfile is located and copies it to /usr/local/etc/php inside of the container.
One final point: I created the php.ini file by going into the WordPress container I customized in the previous article, copied its contents, and saved it locally as php.ini. This way, I know that it is the php.ini file that ships with the WordPress image, but that includes my changes to parameters like upload_max_filesize.
Include the PHP.ini file
The COPY instruction is going to look for the php.ini file in the same directory as your Dockerfile, so let’s add it.
- From within the
wordpressdirectory with your Dockerfile, createphp.ini:touch php.ini - Open this link to the
PHP.inifile I included for WordPress on my GitHub, select all of the text, and copy it. - Open the
php.inifile you created with your text editor and paste the text into it. - Save
php.ini.
Build the image with docker build
Dockerfiles build Docker images. To test my Dockerfile, I use the docker build command. I included the command on line 2 of my Dockerfile (it’s commented out).
$ docker build -t wordpress_local:wp_custom_1.0 .
docker build: Build a Docker image.-t: Tag the image with thename:tagformat. In this case the name iswp_custom_imageand the tag islocal_0-1. The name and tag values I used are just for demonstration, so feel free to use whatever naming convention you like..: This trailing dot is very important. This represents the path to your Dockerfile. In this case, since we are in the same directory as our Dockerfile, that path is represented with..
There will be a lot of output. Look for the “steps.” Each step is an instruction from the Dockerfile. Starting with FROM, Docker is running a container for each step, making the changes like installing packages. After it completes an instruction, Docker commits that container as an image before creating the final image.
$ docker build -t wordpress_local:wp_custom_1.0 .
Sending build context to Docker daemon 81.92kB
Step 1/4 : FROM wordpress:latest
---> 24fd630a789d
Step 2/4 : RUN apt update && apt upgrade -y && apt autoremove && apt install -y vim wget mariadb-client
---> Running in d8dcb0998c14

You can see the hash values for each container as well as the term “intermediate container.”
Removing intermediate container d8dcb0998c14
---> 9dcbb094667a
Step 3/4 : COPY php.ini /usr/local/etc/php
---> 7c9b481bc402
Step 4/4 : RUN wget https://raw.githubusercontent.com/wp-cli/builds/gh-pages/phar/wp-cli.phar && php wp-cli.phar --info&& chmod +x wp-cli.phar && mv wp-cli.phar /usr/local/bin/wp && rm /usr/local/etc/php/php.ini-development && rm /usr/local/etc/php/php.ini-production
---> Running in 5cba656a2113
When the final instruction is completed, Successfully built and a hash value for the Image ID displays.
Removing intermediate container 5cba656a2113
---> 42c5b5c4d6a5
Successfully built 42c5b5c4d6a5
Successfully tagged wordpress_local:wp_custom_1.0
Use docker images to list your locally stored images. You can identify the customized WordPress image using the REPOSITORY, TAG, and IMAGE ID values.

Create a Dockerfile for customizing a phpMyAdmin image and build it
Now that we’ve created our first image from a Dockerfile, let’s create another that integrates the PHP configuration changes into the phpMyAdmin image.
- From within the
dockerfilesdirectory you created earlier, create aphpmyadmindirectory.$ mkdir ~/Documents/docker/dockerfiles/phpmyadmin - Navigate into that directory and create a file called
dockerfile.$ cd docker/dockerfiles/phpmyadmin && touch dockerfile - Open this link to my phpMyAdmin Dockerfile for WordPress on GitHub, select all of the text, and copy it.
- Open the
dockerfileyou created with your text editor and paste the text from my Dockerfile into it. - Make any changes to file names or file paths that are needed and save your
dockerfile. - From within the
phpmyadmindirectory with your Dockerfile, createphp.ini:$ touch php.ini - Open this link to the
PHP.inifile I included for phpMyAdmin on my GitHub, select all of the text, and copy it. - Open the
php.inifile you created with your text editor and paste the text into it. - Save
php.ini. - From within the
phpmyadmindirectory, run the docker build command:$ docker build -t phpmyadmin_local:phpmyadmin_custom_1.0 . - Watch the steps and all of the output and look for the final
Successfully builtmessage. - Use
docker imagesto list your images and look for the new image you have created.

Use your own image with your Docker Compose project
Now we have created our own image, we can include that with our Docker Compose project.
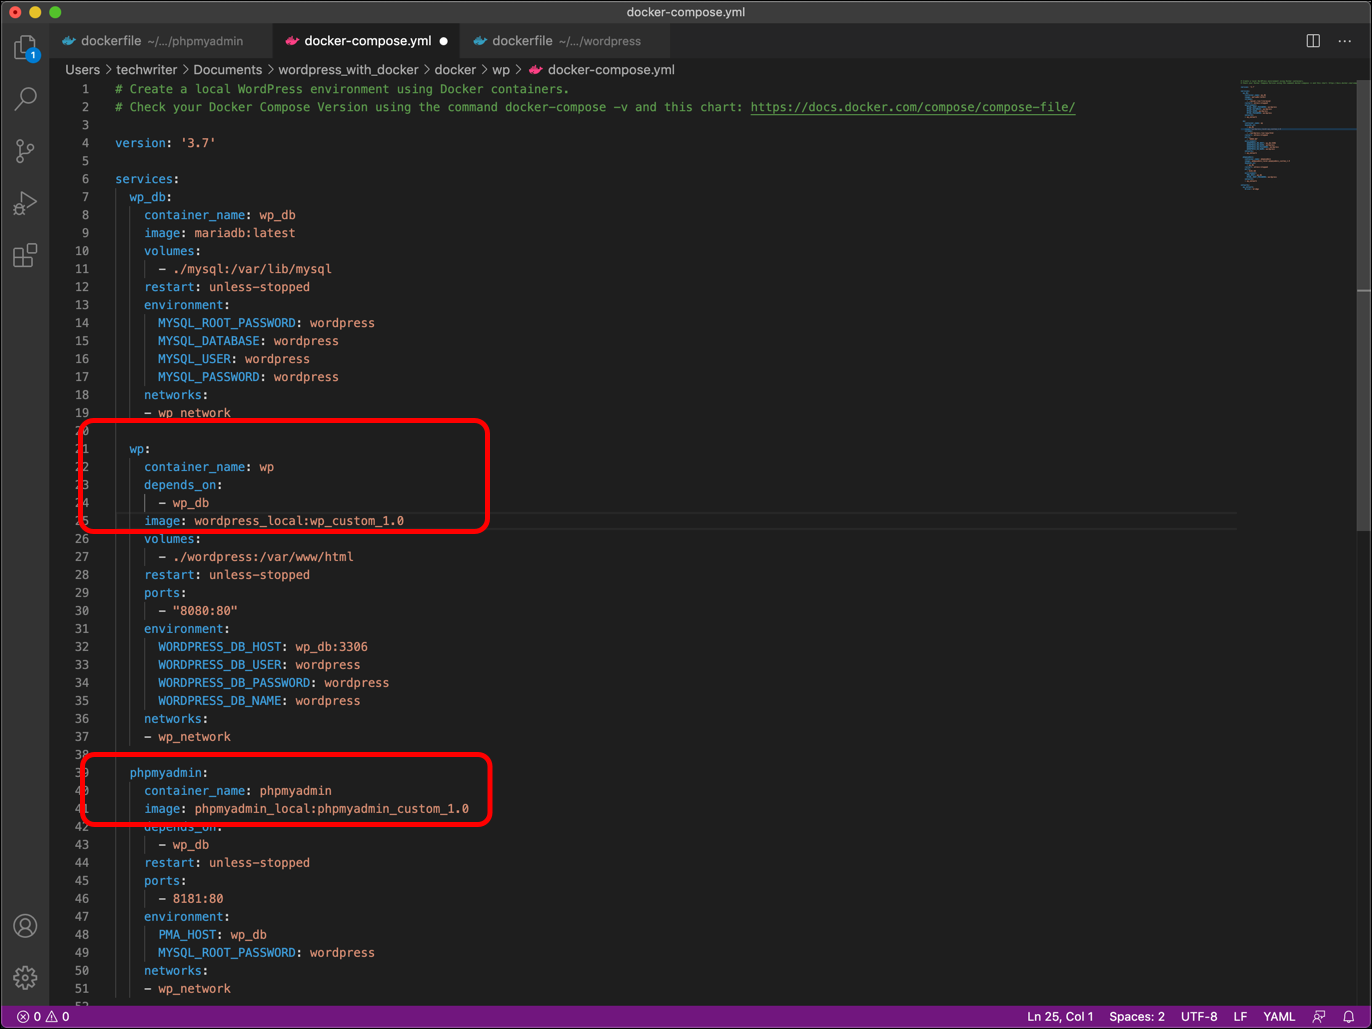
Open your docker-compose.yml file. Look for the image: key under wp (the WordPress container) and phpmyadmin (the phpMyAdmin container). The existing version of docker-compose.yml had the value of wordpress:latest (for WordPress) and phpmyadmin/phmyadmin:latest (for phpMyAdmin). These are the images that your local machine will pull from Docker Hub. But we can replace the values for image: with the names of the images we built from our Dockerfiles:
wordpress_local:wp_custom_1.0phpmyadmin_local:phpmyadmin_custom_1.0
Here’s what that looks like in the docker-compose.yml file:

The next time you run docker-compose up -d, your Docker application will be created with the images that you built with your Dockerfiles.
Up next, a conclusion: WordPress and Docker: Putting it all together.


Hi Philip,
Thank you very much for this demo. I love it.
Short and to the point, but still explains how we got here.
Now I know a little more about docker.
Thank you!
Best
Kim
Hi Philip,
I was searching all over the internet to get some idea about building a custom WordPress images as part of building a CICD pipleline. Your this tutorial blog gave me some idea about it.
Thanks a lot.
Regards,
Amjad
Amjad: Sorry for the slow reply. I’m glad to hear this helped you out! Have fun with that CI/CD pipeline!
i am from india, i was searching all over the internet for customising wordpress and i was also interested to build my own comfortable images with my own settings for my future projects but your blog caught my eyes and i am so glad to know that your explanation was neat and upto the point which i just wanted, i am familiar with linux commands and OS debian, thanks a lot for you. if you have any course on the udemy or any other platform let me know i would love to subscribe.
i wanted to create my own website on raspberry pi, i have created website but i am facing difficulties in themes error which i will try after i modify php.ini.
the website micsdesigners.in is what i am trying to create. it is live but unable to fully make it functional.