This is part three of five in my Use Docker to create a local WordPress development environment tutorial.
While I am using these containers to build and improve a WordPress site, sometimes I need to make changes to the containers themselves to meet my requirements.
By default PHP restricts the size the files you can upload into WordPress to 2MB. This is limiting, because I may want to upload an audio file or a high-res photo. And if I want to import the database for an existing WordPress site into phpMyAdmin, that database can easily be larger than the 2MB cut off. So I need to change that value in PHP.ini. Let’s start with the container created from wordpress:latest, which I named wp in my Docker Compose file. First, I will enter the container to use Bash as root using the docker exec command. The docker exec allows you to run a command in the container. This command looks a lot like the command we used in WordPress and Docker: Introduction to Docker and basic Docker commands to create a container and enter it with a Bash shell – note the -ti and bash options, with the name of the container, wp.
$ docker exec -ti wp bash
The command line interface that I am now interacting with is within the Docker container and no longer the command line for the machine hosting the Docker containers (my laptop).
Note: To better communicate when I am interacting with the command line of the host machine and when I am using the command line within the Docker container, I will use the following notation:
$: The prompt on the host machine.<Container-CLI>#: The prompt of the Docker container.
I’m not going to tell you how long it took me to find them, but for this image’s file system, which is based on Debian, the PHP configuration files are in /usr/local/etc/php, so navigate there.
<Container-CLI># cd /usr/local/etc/php
If you list the contents of that directory, you find two php.ini files, php.ini-development and php.ini-production. I am going to remove php.ini-development and rename php.ini-production to plain, old php.ini:
<Container-CLI># rm php.ini-development
<Container-CLI># mv php.ini-production php.ini
Now we need to edit php.ini. But this image did not include a text editor, or at least not Nano or Vi. So I need to install one of those. And even though the WordPress images are updated very frequently, I always like doing an update.
<Container-CLI># apt update && apt upgrade -y
<Container-CLI># apt install vim
Now I have Vim, I can change those PHP.ini configurations:
<Container-CLI># vim php.ini
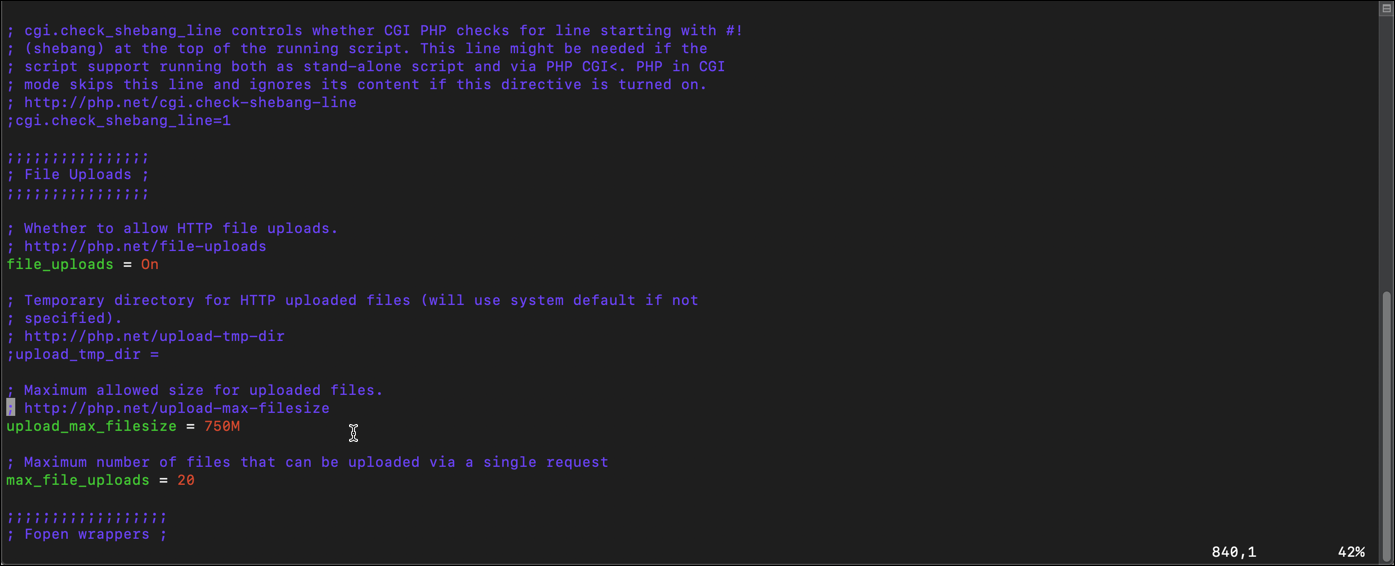
As I understand, you start by assigning the greatest value to memory_limit, and lower values until you get to upload_max_filesize. I also changed max_execution_time to give scripts longer to run. Changing expose_php to Off makes the installation slightly more secure by making it harder for others to determine which version of PHP is running. Use Vim’s search function to find each of the following properties and change their values. You can use whatever values you want. I use these:
memory_limit = 1024M
post_max_size = 800M
upload_max_filesize = 750M
max_execution_time = 360
expose_php = Off
Save the file. Since I am using Vim, I do that with :wq.
While I am here, there are some other things I want to add to this container. I have been playing around with the WordPress CLI, so I want to add that. But I need wget to install WP-CLI. It also took me a minute to figure out that with this configuration, WP-CLI needs the MariaDB Client to communicate with our MariaDB service. The following commands install wget and the MariaDB client, and then downloads and installs the wp-cli.phar file.
<Container-CLI># apt install wget mariadb-client
<Container-CLI># wget https://raw.githubusercontent.com/wp-cli/builds/gh-pages/phar/wp-cli.phar
<Container-CLI># php wp-cli.phar --info
<Container-CLI># chmod +x wp-cli.phar
<Container-CLI># mv wp-cli.phar /usr/local/bin/wp
Now I have customized this container, I want to create my own image of it so that I can use it in the future. Here’s how you “commit” a Docker container, or convert it to an image, locally. From the command line of the Docker host machine:
$ docker stop wp
$ docker commit wp wp-custom:local_0-1
docker commit: Commit a container image to your local registry.wp: The name of the container to commit.wp-custom: The name of the imagelocal_0-1: A version tag I am using to identify that image.
But I started by talking about my phpMyAdmin container, which also has PHP upload_max_filesize limitations. So I also need to change those values, and I make the same updates that I did to the WordPress container.
<Container-CLI># docker exec -ti phpmyadmin bash
<Container-CLI># cd /usr/local/etc/php
<Container-CLI># rm php.ini-development
<Container-CLI># mv php.ini-production php.ini
<Container-CLI># apt update && apt upgrade -y
<Container-CLI># apt install vim
<Container-CLI># vim php.ini
In php.ini I make the same changes that I made in the WordPress container and save the file:
memory_limit = 1024M
post_max_size = 800M
upload_max_filesize = 750M
max_execution_time = 360
expose_php = Off
Commit those changes to the phpMyAdmin container:
$ docker stop wp
$ docker commit phpmyadmin phpmyadmin-custom:local_0-1
Depending on how familiar you are with the Linux command line, the file system, text editors, etc., this won’t take too long. But what if there were a way to apply all those customizations to your container before you even entered that docker-compose up -d command?
In the next article, we’re going to do that with Dockerfiles: WordPress and Docker: Build custom images with Dockerfiles.