
This is part two of five in my Use Docker to create a local WordPress development environment tutorial.
I was wondering about how one might use Docker to create a local WordPress site and quickly found a tutorial from Docker. The tutorial leverages another component of Docker, Docker Compose, which is often used for the orchestration of multiple containers that work together. That’s the way I tried to say it, but here’s how Docker explains Docker Compose:
… A tool for defining and running multi-container Docker applications. With Compose, you use a YAML file to configure your application’s services. Then, with a single command, you create and start all the services from your configuration.
Docker.com
I played around with the different options and kept Googling different uses of Docker Compose for WordPress. A tutorial on Digital Ocean gave me the idea of adding a phpMyAdmin as its own container. I also got a few ideas from a GitHub repo that used Alpine containers. After trying lots of different configurations and options, I came up with the Docker Compose file that you will find in the GitHub repository I created to complement this series of articles.
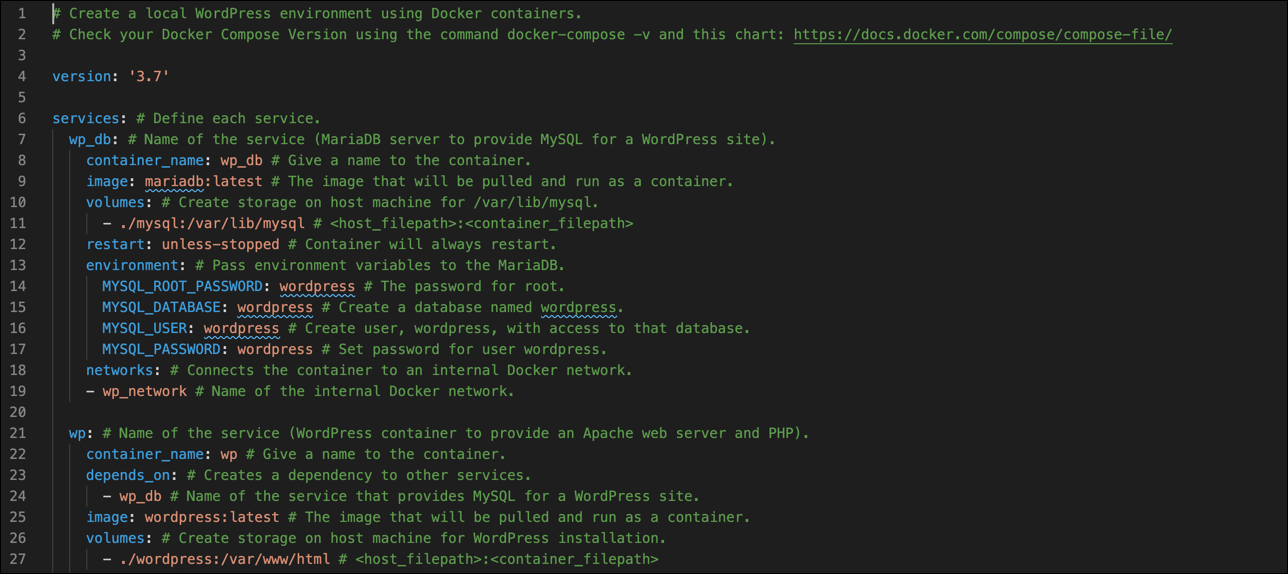
Create a Docker Compose file
- Verify that Docker (specifically the Docker daemon, AKA the Docker Engine), is running.
- Create a directory on the host machine for all of your Docker projects:
$ mkdir ~/Documents/docker - Create another directory within
dockerfor your WordPress environment. Then change into that new directory:$ mkdir docker/wp && cd docker/wp - Create a file named
docker-compose.yml. All Docker Compose projects need to be in its own directory, and must include a YAML file nameddocker-compose.yml(and only one file with that name).touch docker-compose.yml - Open this link to my Docker Compose file for WordPress on GitHub, select all of the text, and copy it.
- Open the
docker-compose.ymlfile you created in your text editor and paste the text from my Docker Compose file into it.
I explain the specifics of this Docker Compose project by including a very heavily commented version of it in my GitHub repo, so please take a look at that.
My Docker Compose file creates three containers, or “services,” provides information about what images to create those containers from, and assigns properties dealing with networking, environment variables, and persistent storage. It also defines the relationship between those services with dependencies. And all three containers are connected by the same internal Docker network.
Run the Docker Compose file
Make sure you have navigated into the directory where your docker-compose.yml file is located.
$ cd ~/Documents/docker/wp
Before we create our containers, a word about images: if the images you specified in your Docker Compose file have not already been downloaded (“pulled”) to your machine, they will be pulled by Docker Compose. However, if they do already exist on your local machine, you can pull the images before running Docker Compose to make sure you really do have the “latest” images:
$ docker-compose pull
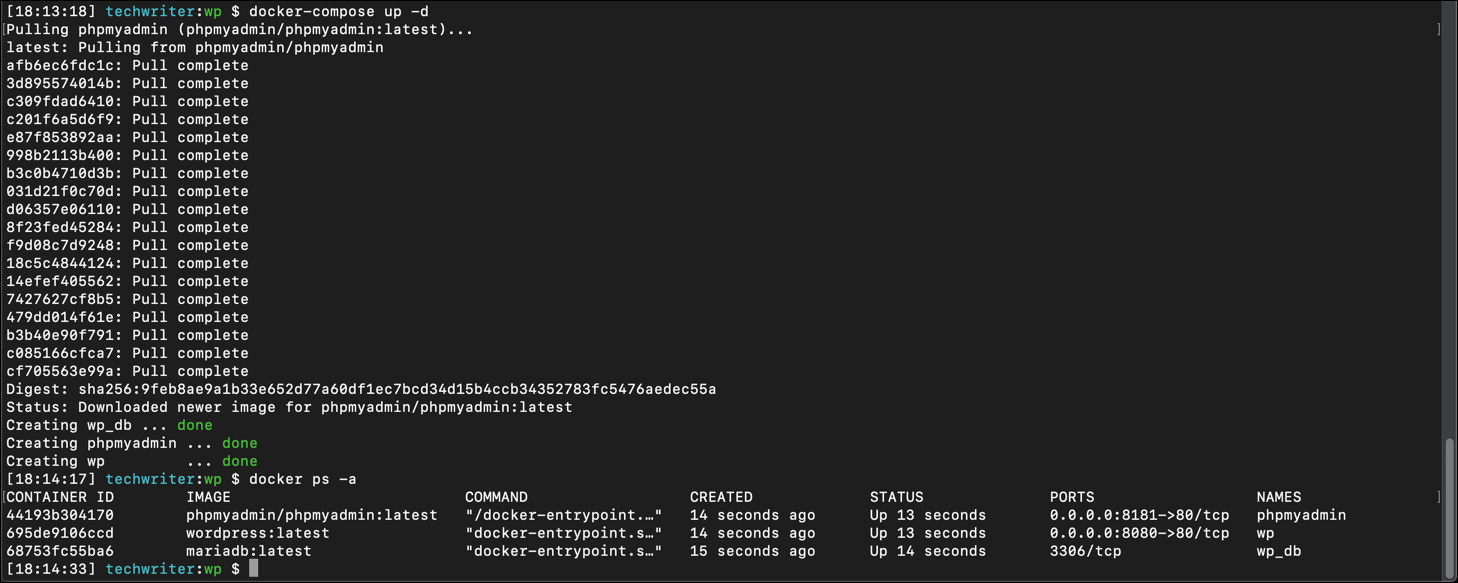
OK. Let’s create some containers. Enter this command:
$ docker-compose up -d
docker-compose: Use Docker Composeup: Creates the networks and containers specified in thedocker-compose.ymlfile.-d: Run in detached mode. This means the containers will spin up, but you will stay on the command prompt. If you do not use the detached mode option, you will see the combined output of all of the containers and if you exit that, the containers stop. So use-d.
The output on the screen will show the creation of the network and the container.
$ docker-compose up -d
Pulling phpmyadmin (phpmyadmin/phpmyadmin:latest)…
latest: Pulling from phpmyadmin/phpmyadmin
b3b40e90f791: Pull complete
c085166cfca7: Pull complete
cf705563e99a: Pull complete
Digest: sha256:9feb8ae9a1b33e652d77a60df1ec7bcd34d15b4ccb34352783fc5476aedec55a
Status: Downloaded newer image for phpmyadmin/phpmyadmin:latest
Creating wp_db … done
Creating phpmyadmin … done
Creating wp … done
Identify which containers are running with docker ps -a.
For a breakdown of the output of docker ps -a, see WordPress and Docker: Introduction to Docker and basic Docker commands.
When you executed the docker-compose up -d command, the docker-compose.yml file was the only item in the directory If you look again, Docker created the mysql and wordpress directories specified in the Docker Compose file.
Before running docker-compose up -d:

After running docker-compose up -d:
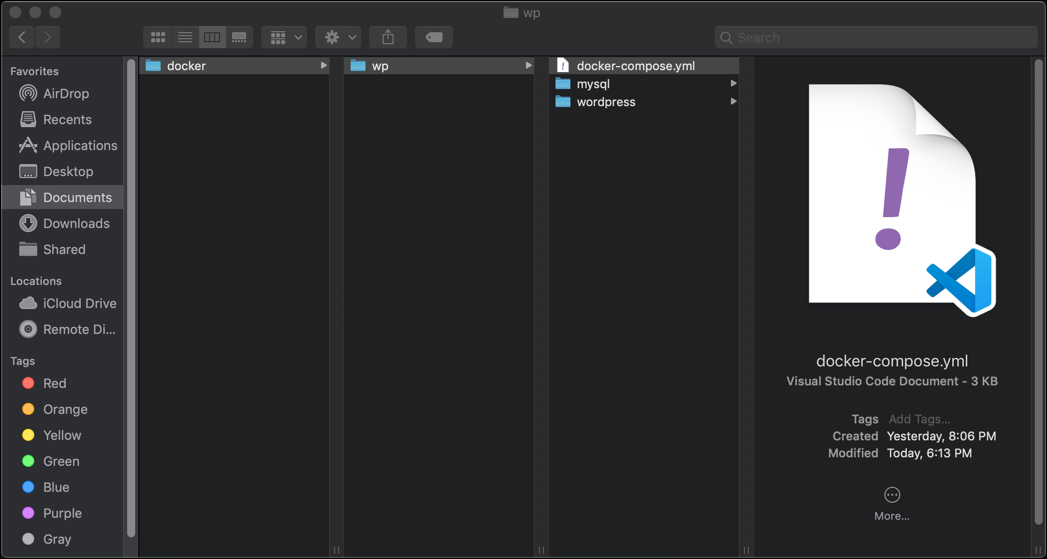
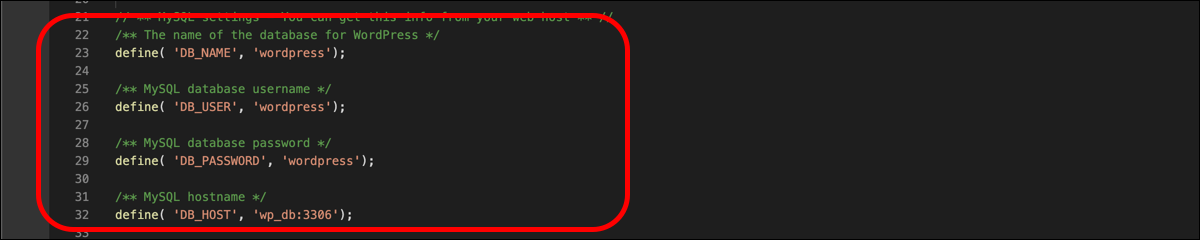
If you look in the wordpress directory, you will see the standard WordPress installation structure, and if you open wp.config.php, you will see that docker-compose has populated the file with the environment variables that you specified in the Docker Compose file.
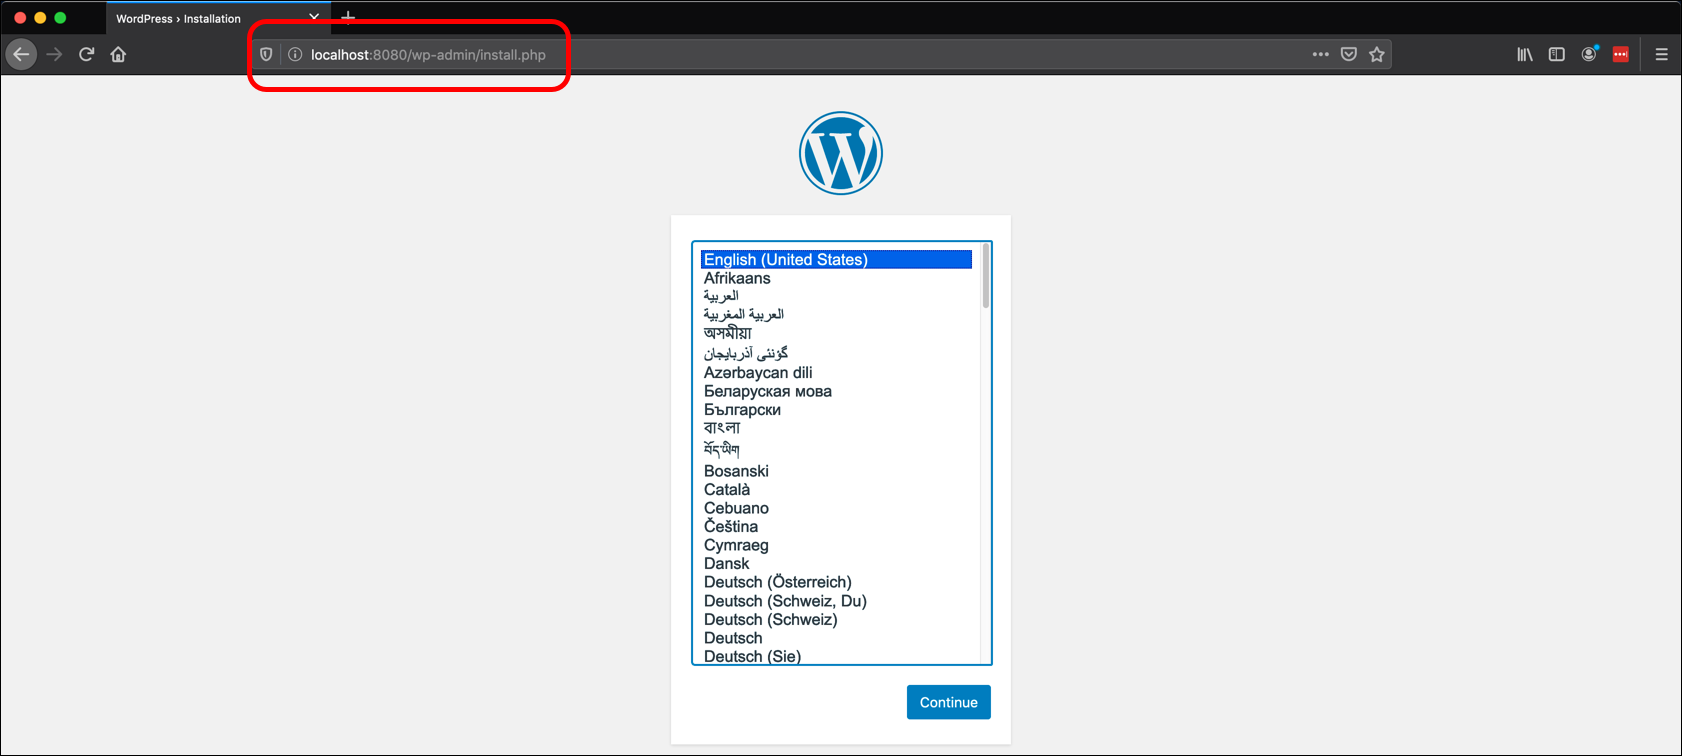
After you give the containers a little bit of time to spin up, go to your web browser and navigate to localhost:8080. In docker-compose.yml, we defined ports: 8080:80, meaning that localhost traffic on port 8080 is forwarded into the container on port 80. If everything worked, you will see WordPress installation screen asking you to pick a language and click Continue.
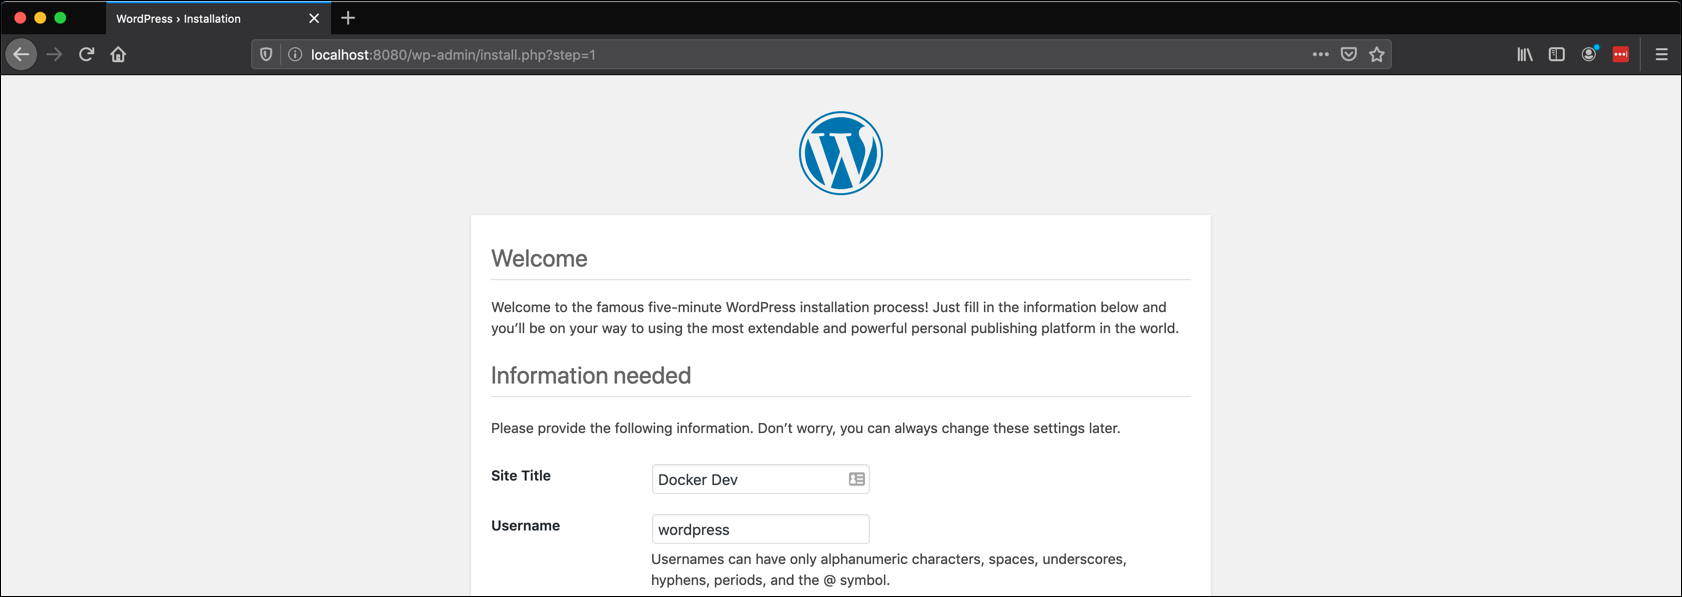
The next screen walks you through WordPress’s “five-minute install.”
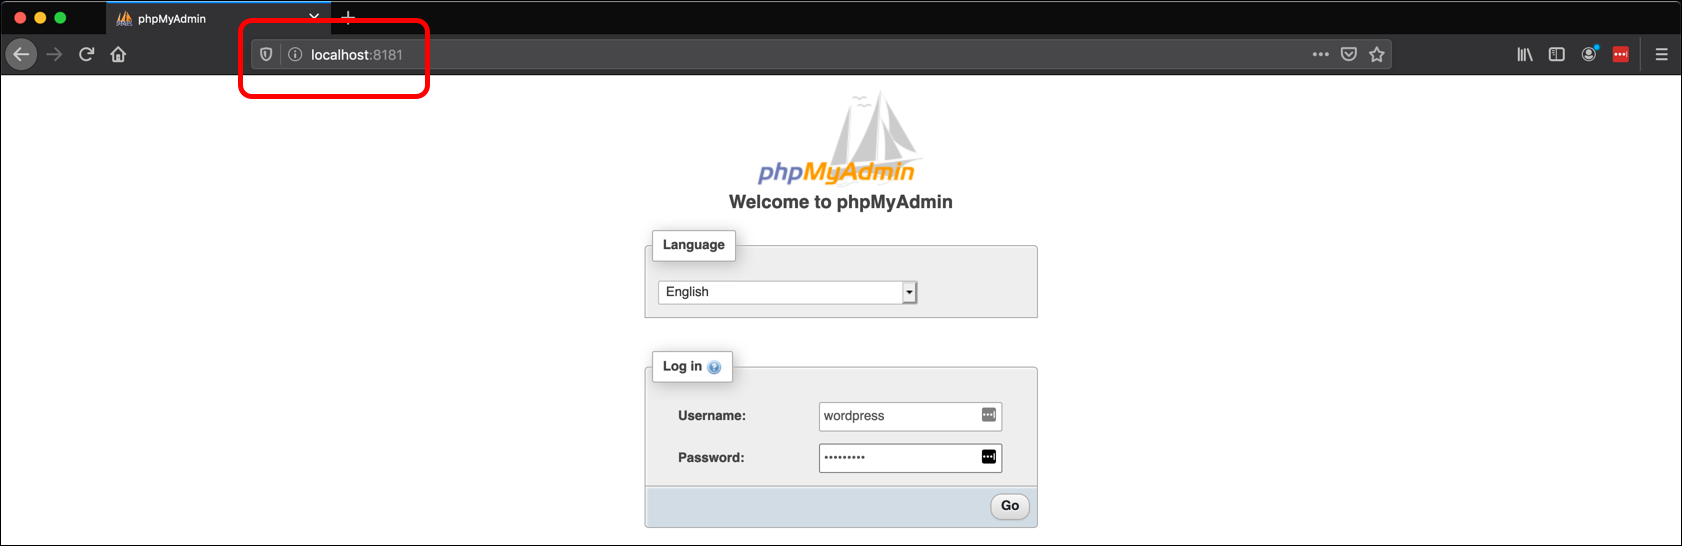
If you open another browser tab or window and navigate to localhost:8181, you should see the phpMyAdmin login screen. In our case, we set the password for the root user as wordpress. We also created another, non-privileged user with the username and password of wordpress.
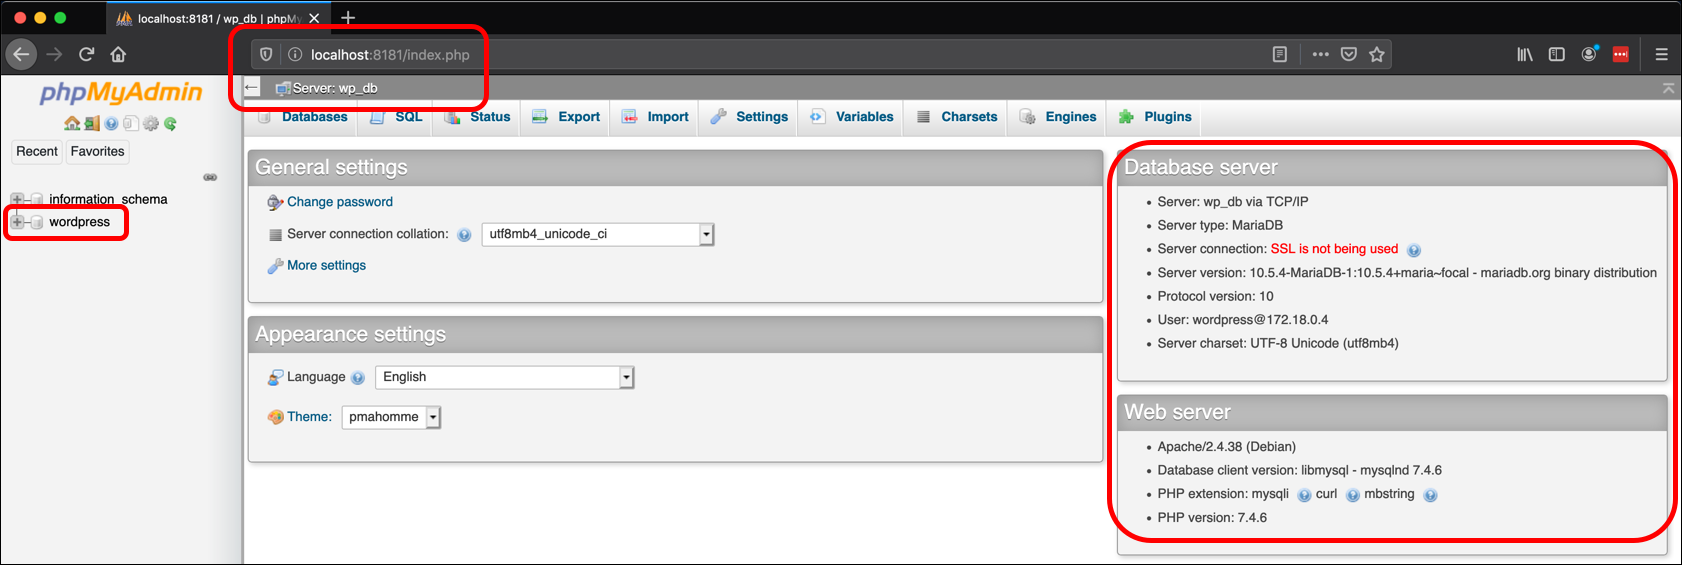
The homepage of phpMyAdmin displays some of the details configured by the Docker Compose file, such as the database wordpress in the left sidebar, the name of the database server (wp_db), and other details about the web and database servers.
You can now use phpMyAdmin to work on your WordPress databases. Since I have used my Docker environment to do local development work on a site that is already in production (this one), I find the phpMyAdmin service to be very useful for importing and exporting databases.
Basic Docker Compose commands
Since most of your containers have been defined by the Docker Compose file, you can just run them. However, here are some basic commands that you can use to monitor them and change their running state. Remember that to use the docker-compose command, you need to enter the command from within the directory where you created the docker-compose.yml file.
As always, check the status of all running containers with docker ps -a.
Sometimes you may want to restart the containers. Use docker-compose restart.
$ docker-compose restart
Restarting phpmyadmin … done
Restarting wp … done
Restarting wp_db … done
If you don’t need the containers to keep running, you can stop them with docker-compose stop.
$ docker-compose stop
Stopping phpmyadmin … done
Stopping wp … done
Stopping wp_db … done
If you need them again, use docker-compose start.
$ docker-compose start
Starting wp_db … done
Starting wp … done
Starting phpmyadmin … done
You can also start, stop, restart, or remove individual containers. That could be done by using the SHA-256 hash value that Docker uses as a container identifier, but since you named the different containers in the docker-compose file, you can use that, too:
$ docker stop 08f107
$ docker start wp_db
$ docker restart wp
$ docker rm phpmyadmin
If you want to run a Bash shell within the WordPress container named wp, use docker exec:
$ docker exec -ti wp bash
Maybe you did something wrong and you just don’t like what you created. To tear down what you created with your Docker Compose file, use docker-compose down:
$ docker-compose down
Stopping phpmyadmin … done
Stopping wp … done
Stopping wp_db … done
Removing phpmyadmin … done
Removing wp … done
Removing wp_db … done
Removing network wp_network
This command will remove the network and the containers, but not the images, or any storage volumes on the host machine. So in this case, the mysql and wordpress directories will remain in the directory with the Docker Compose file.
So we’ve created a WordPress environment with Docker Compose, and it was pretty easy. However, I need to make some more configurations to expand what I can do with these containers, so in the next article I will go over that in WordPress and Docker: Customize a Docker container.